Thursday, October 13, 2011

Homemade Nutella


IMG_2106

Nutella.

I don’t think I know a single person who doesn’t melt a little bit after hearing that word.

Creamy, chocolatey delicious.

Do you remember when Nutella was rare in this country? People would horde it after travelling to Europe because it was such a pain to get your hands on. Not any more though. You can find Nutella on most grocery shelves. That doesn’t change how good it is.

What’s better than Nutella? Homemade Nutella. How about homemade Nutella on fresh bread?

I came across the idea of making my own Nutella after visiting Fastachi, a nut and chocolate store that has some of the freshest most delicious nuts. After seeing the beautiful pile of freshly roasted hazelnuts, I started to wonder if it were possible to match that ever sought after taste of Nutella. Sure enough, not only is it possible, it’s extremely simple with only THREE ingredients. The end result is a fresh delicious spread that brings Nutella to an extreme. Dark and chocolately combined with the intense flavor of roasted hazelnuts. You can’t get more pure than this.

This Nutella would make the perfect fun and creative gift (the holidays are slowly approaching!) Just put it in a cute jar with a bow and ta-da! Instant wow-factor! It also would make a great I’m sorry don’t hate me gift, I want to impress you with my culinary genius gift, you did something super nice for me gift, or for just a good…I need chocolate therapy moment.

Try it on ice cream. It’s killer.

IMG_2102

DO it. It’s definitely worth the experiment.

Homemade Nutella

Makes roughly a cup

Ingredients

1 cup roasted hazelnuts (or roast them yourself for a few minutes!)

1/2 cup good quality cocoa powdered (I used a dutch-processed French cocoa from Fastachi)

Roughly 1 – 1 1/2 cup powdered sugar

a pinch of salt

Directions

IMG_2091

Put all of the hazelnuts into a food processer and blend until liquid (about 5 minutes, it’s awesome!)Slowly add the cocoa powder, sugar, and salt. Blend until combined. Adjust sugar amount to liking. Enjoy!

So simple!

IMG_2096

If you put it in the fridge it will become a bit harder like Nutella and not as liquid.

IMG_2110

Coincidence my jar says magic? I think not!

Thursday, September 22, 2011

Birthday Cake

IMG_2030

Well well well. Looks like we’ve found ourselves back at a pretty awesome period of time. Myy birthday time.

Yes. I do like my birthday. Yes, I do act like a little kid and start yelling out that it’s going to be my birthday a month in advance (my roommates can vouch). Yes. I do bake my own birthday cake.

Who says someone else has to bake the cake?? In case you hadn’t noticed, I kinda like to bake. Get over it!!

This cake was special for several reasons. Let me list them off

  • It’s my birthday, meaning it achieves automatic special status
  • It had TWELVE, read it, a whole dozen eggs
  • NO flour. None! what? Crazy!! I know!
  • No butter either!

IMG_2024

No really, this was a cake, and it wasn’t a diet cake. Do diet cakes even exist? Believe me, there was enough chocolate in this sucker that made up for the lack of butter. What is the point of a diet cake anyways? I am so confused now.

Nope, all twelve egg yolks are mixed with sugar and TONS of delicious melted chocolate. All TWELEVE (it’s crazy really) egg whites are beaten until they begin to take over your house like Strega Nona’s magic pasta pot did when Anthony forgot the magic words to stop it. Great book, check it out.

Some how, these things combine together to make the lightest chocolate you’ve ever eaten. So light, that the original recipe titled it “lighter than air chocolate cake”. I find that hard to believe. Air is pretty light. This comes pretty darn close.

The frosting? Alcoholic whipped cream. No, not like that stuff that started popping up in liquor stores. REAL whipped cream, with real(?) alcohol.

Of course it was fantastic, especially shared among wonderful friends who took time to come celebrate!

On another note – no flour means Passover friendly! I know you’re all excited now!

Let’s get this party started.

Warning- this cake was kinda a pain in the butt. GREASE WELL and you may have a prettier cake than mine.

Cake Ingredients:
12 oz fine-quality bittersweet chocolate (not unsweetened), chopped
6 tablespoons water
12 large eggs, separated, at room temperature
1 1/3 cup sugar
1/2 teaspoon salt
2 tablespoons Dutch-process unsweetened cocoa powder

NOTE! I ended up using 3 cups heavy cream because I didn’t have enough to make good layers. Either be stingy with your frosting or get more cream!

Frosting:
2 cups heavy cream
6 tablespoons confectioners sugar, sifted
4 tablespoons Grand Marnier*

To make the cake preheat the oven to 350, and GREASEEEEE, line, and grease again 4 cake pans (I used two and changed them out)

Melt chocolate with water on the stove over low heat, stirring frequently to prevent burning. Turn off and let cool to luke warm.

Beat egg yolk 2/3 cup sugar, and salt in a large bowl with a beater until thick and pale (8 minutes with hand mixer). Fold in chocolate.

IMG_2026

Beat egg whites in a very large bowl with a clean beater until whites hold soft peaks. Slowly mix in remaining 2/3 cup sugar and beat until stiff peaks (really, beat well). Fold in thirds the whites into the chocolate mixture. Fold gently but thoroughly .

Spread batter in four baking pans and bake until puffed and dry to the touch (anywhere from 15-20 minutes). Cakes will sink a bit in the middle (so sad!).

remove cakes from pans CAREFULLY, and freeze layers for roughly an hour.

To make frosting: Beat cream with sugar and Grand Marnier until whipped cream holds stiff peaks.

Alternate layers of frosting and cake until stacked pretty! (unlike mine). Refrigerate for at least an hour to ensure defrosted cake layers.

IMG_2029

I have to apologize. Not only did my cake turn out ugggly (grease your pans!!!), I took really bad pictures of it.

What can I say, a drink in hand and a good conversation can be quite distracting.

Happy baking (and birthday to me )

Leah

Tuesday, August 30, 2011

Barley Black Bean Salad


IMG_2021


I literally have 4 posts partially done.

I have delicious things to report on, that I want you to feel the need to run to your kitchen after reading. Why can’t I just finish them? I’ll get there.

For now I will distract you with a super simple, quick, wonderful grain salad.

I swear I eat real food. I don’t just bake and eat that all day…although that’s not a bad idea.

This is proof! This salad is bright and colorful, chewy from the barley, creamy from the beans, crunchy from the pepper, and gets a note of crisp freshness from the cilantro lime dressing.

Don’t like barley? I don’t like you!

…Just kidding. I love all of you.

Trade it out! I think the original recipe called for rice (borrinng!). I’ve made it with quinoa. I’m sure you could do something crazy like use…wheat berries?

Perfect potluck dish! Just…go make it. I don’t have a whole lot else to say.

Black Bean Salad with Chili Lime Dressing

Ingredients

1 can Black beans

1/2 cup Barley (or grain of choice)

1 to 1 1/2 Colored pepper (use different colors and it’s SUPER pretty!)

1 tomato (optional)

1/2 sweet/red onion (I actually forgot it this time and its fine)

1/2 cup fresh cilantro

dressing

1 lime

1 Tbs olive oil, or more to your preference

1/2 tsp cumin

1/2 tsp chili powder

pinch of cayenne (more if you want it spicier)

salt and pepper to taste

Directions

Bring 1 cup of water to boil in a small pan. Add Barley and simmer for 30-40 minutes or until tender. Chop all vegetables, and wash and chop cilantro. Mix all dressing ingredients together.

Add cooked barley, vegetables and dressing in a bowl and stir!

Makes about 3-4 servings

Super easy right?

Really, the barley should be cooled in the fridge and then all ingredients are mixed, but I am generally hungry by that time, so I just eat it warm. Still good.

On a side note…I definitely made the spice amounts up…just taste it until you think its right. You can always doctor later (welcome to my world of cooking!)


NOW!

Take a look at all my pretty pictures that I probably will never post on!

IMG_1995

My first ever tomato plants!

IMG_1998

I learned that container gardening is amazing


IMG_2004


IMG_2008

FYI Serrano chilies are hottt

IMG_2012

Salsa roastingg!

Tuesday, July 19, 2011

Blueberry Birthday Cake


DSC_0193

Holy life change Batman!

Wanna hear what’s been going on?

  • Graduated with a Master’s
  • Started working full time hours
  • Moved home briefly
  • Boyfriend returned home
  • Moved to a new city
  • Got my first SALARY and job title!

No biggie.

OH and my computer was broken for like THREE weeks!!!

The combination of switching to the “real world”, moving to a new place (and kitchen…hugeeee kitchen with a GAS STOVE!!), and it being stupid summer hot in the apt has severely limited the bakeage going on in my life.

Never fear, a birthday has once again struck the scene!

My darlin boyfriend has retuned home and obviousllllyyy I wasn’t' going to let the heat and all of my other excuses prevent me from birthday caking!

Summer is a special place in Massachusetts. We’re not California. We don’t cheat and get spoiled with delicious local produce all year round (jerks). So when things are in season, you horde them…enjoy them.

Therefore I chose to make this delicious berry cake!

It’s a vanilla butter cake with blueberries baked INSIDE (um giant blueberry muffin cake?) with a – get this – lemon whipped cream, cream cheese frosting, and of course, decorated with more berries.

 DSC_0184

The cake originally comes from Joy the Baker (sensing a theme?), but I upped the berries in the cake and chose a different frosting, and most likely didn’t measure as accurately. I’m sure you could use whatever berries are in season around you, or even something like peaches, although I would be careful how much water your fruit would add to the cake (either macerate the fruit or try adapting with more flour)

Big Berry Birthday Cake

(or giant blueberry muffin cake) 

from Joy the Baker

2 sticks unsalted butter, softened to room temperature

1 3/4 cups granulated sugar

4 large eggs

1 cup milk (the higher the fat, the more delicious)

1 Tablespoon vanilla extract

1/2 vanilla bean, seeds scraped out ( I didn’t use this but it would be SO good)

2 3/4 cups all-purpose flour

1 1/2 teaspoons baking powder

1/2 teaspoon salt

1 Pint blueberries plus more berries of any type to decorate wtih

Preheat oven to 350 degrees F.  Butter and flour two 8-inch round baking pans WELL and set aside.  DO THIS! Otherwise your muffin-like cake will end up sticking to the pan and you will break it trying to get it out and then you will glue it back together with frosting and then it will break and fall into your boyfriends lap when he is sitting on your very slanted porch. (don’t worry…he caught it and ate it)

DSC_0186

Cream the butter and sugar on medium speed for 3 to 5 minutes or until light and fluffy.  Add the eggs, one at a time, beating for one minute after each addition.  

In a small bowl whisk together flour baking powder and salt.  

In a separate small bowl combine the milk, vanilla extract and vanilla seeds (if using).  

Alternate adding the flour mixture and the milk mixture in three batches, starting and ending with the flour.  When the batter is just combined, shut off the mixture and thoroughly incorporate the dough with a rubber spatula. the batter should be this awesome fluffy light texture. DON’T beat it too much. Carefully add in roughly a pint or less (I used about a big handful under) of blueberries, and barely mix in.

Divide the batter between the two pans.

Bake for 35 to 40 minutes, or until a pale golden color, and a skewer inserted in the center of the cake comes out clean.  

Let the cakes cool in the pan for 15 minutes, and continue on a wire rack.  Frost and berry only when cakes are completely cool.  

DSC_0188

Lemon-Whipped Cream-Cream Cheese Frosting

1 lemon zested and juiced

1 Pint of whipping or heavy cream

8 oz of cream cheese

1 Tbs of sugar

1 splash of vanilla extract

pinch of salt

In a chilled bowl, beat together all ingredients except for the heavy cream. Once everything is nicely mixed, beat in the cream until stiff (but not too stiff!) peaks form. Chill until ready to frost. (isn’t whipped cream easy?)

DSC_0189

To assemble the cake, cut berries (if using something like strawberries to decorate) into pretty slices. Frost bottom layer and cover with berries of choice. Stack top cake layer and cover with remaining frosting. Decorate with berries. Impress everyone with deliciousness!


So good! It was summery and wonderful.

DSC_0194

Happy birthday Sam!

-Leah

Friday, June 17, 2011

Pyrex Bread Pudding

Leah moved out a little over two weeks ago, and it is 2 more til we move back in together (Miss you, Leah!) When she was moving out, she asked me if I wanted her to leave any baking supplies. I furiously shook my head, mentioned something about not wanting the responsibility of any subletters damaging or breaking anything, and spouted off a line about probably not baking much anyway. Of course the next day was spent kicking myself for having had turned down the offer to hold on to: a muffin tin, cake pans, cooling rack, casserole dish, cookie sheet, loaf pan, measuring cups, etc.

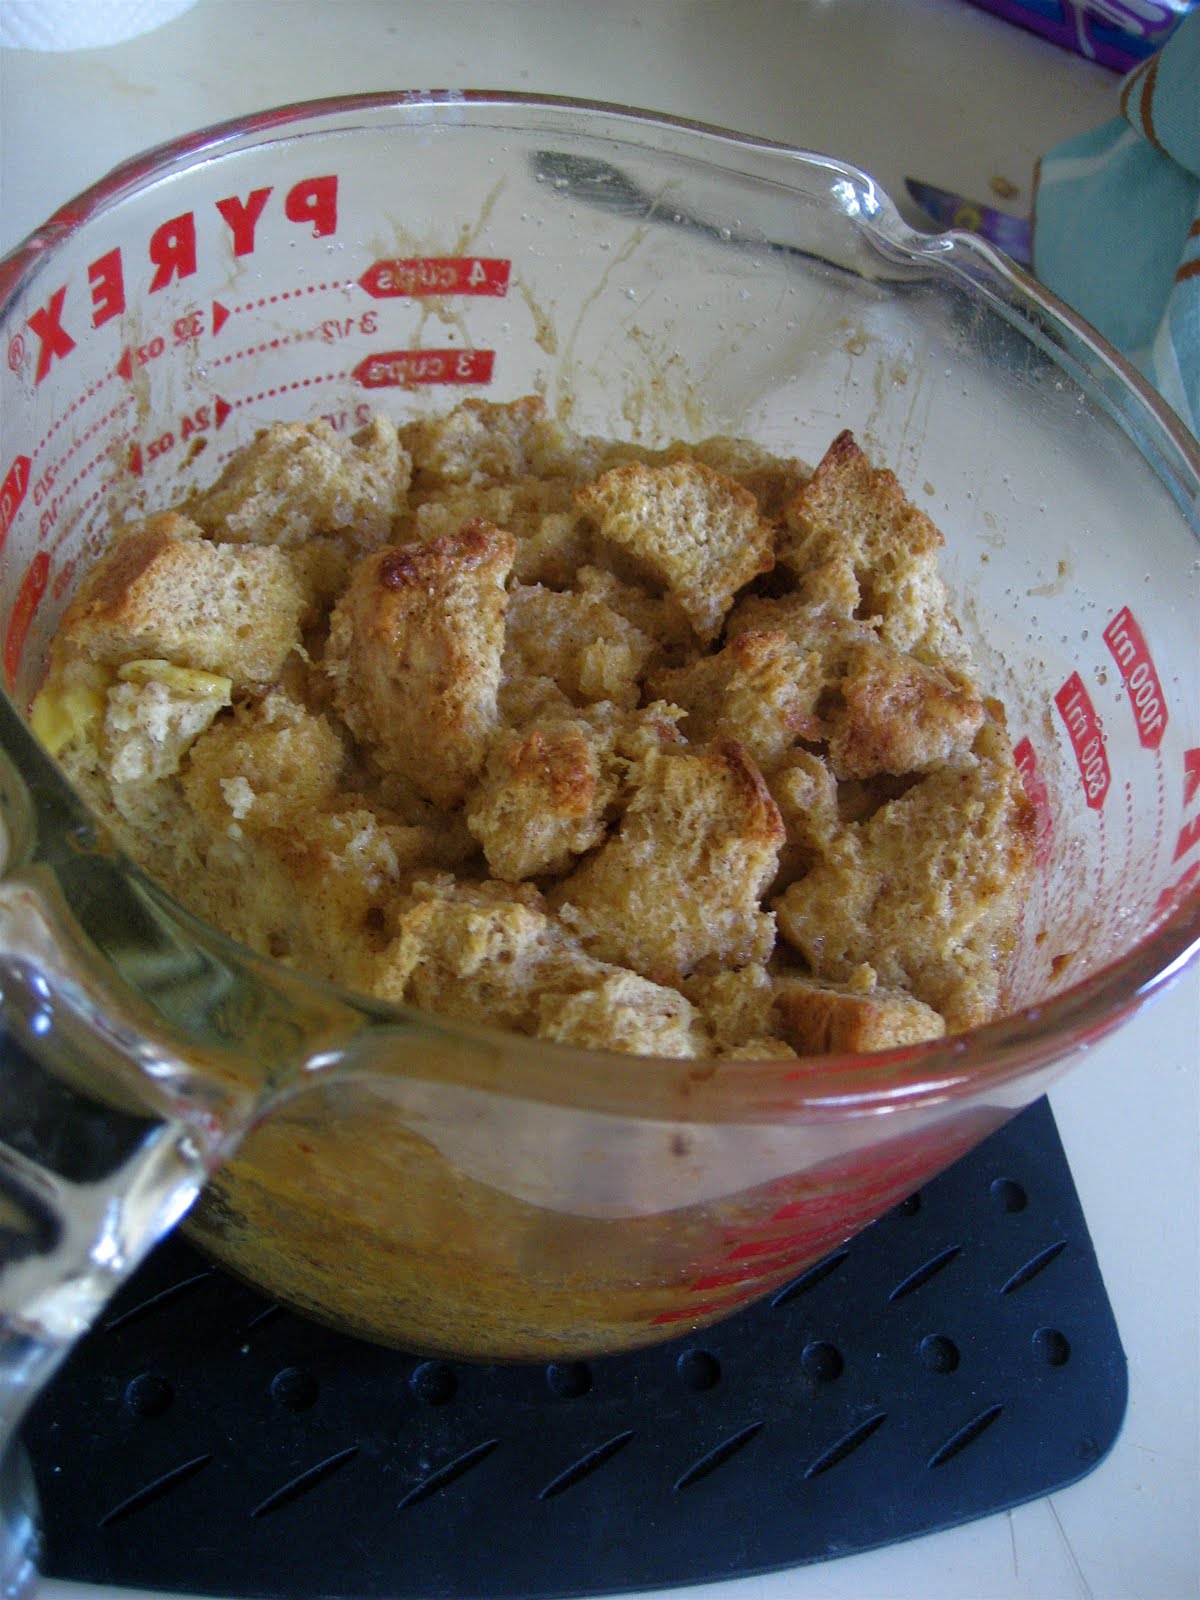
Because I logistically could not bake anything, I had the overwhelming desire to do it. I frantically looked around for ANYTHING I could bake in. After contemplating some ceramic bowls (I don't recommend using them unless specifically oven proof - the glaze could melt and release dangerous chemicals into your food, not to mention it would heat very irregularly) I spotted the pyrex measuring cup. It is made from the same stuff as the baking dish, right? I did some research and decided to go for it. The beauty happens to be a 4 cup measuring cup, and I HIGHLY suggest getting one if you don't already have one.
I had made a few large boules of wheat bread a few days before and found my last one stale and hard as a rock. Instead of carrying it around as a weapon I decided to salvage it by making some bread pudding.

The following recipe is a basic one adapted from epicurious that can be dressed up in a ton of ways. It makes 5-6 servings.

4 Cups of stale bread (pretty much anything will work, you can even toast it a bit)
4 Tablespoons unsalted butter (1/2 stick) melted
3/4 Cup white sugar
3 Eggs
2 Cups milk
2 Tablespoons vanilla extract (I didn't have any, so I used amaretto again)
1 Teaspoon cinnamon
1/4 Teaspoon nutmeg

Grease/butter a small casserole dish (in my case it was the pyrex measuring cup) and preheat the oven to 350 F. Saw the bread into bite sized pieces. If your bread is as stale as mine was, you may need a real saw... In a bowl combine the butter, sugar, eggs, milk, vanilla extract, cinnamon and nutmeg. Lay the bread in the dish and pour your mixture over the top, making sure to get the bread nice and saturated. Stir if you need to ensure it is all soaked. Bake for 40 min and serve hot or cold.


The pudding can be made more custard-y by adding additional eggs. You can also add in things like raisins or other dried fruit, nuts, chocolate chips, etc. I kept mine pretty simple and polished it all off in 2 days...

So much for not baking!
~Kai